Agras T50 Guide for High-Altitude Wildlife Survey Work
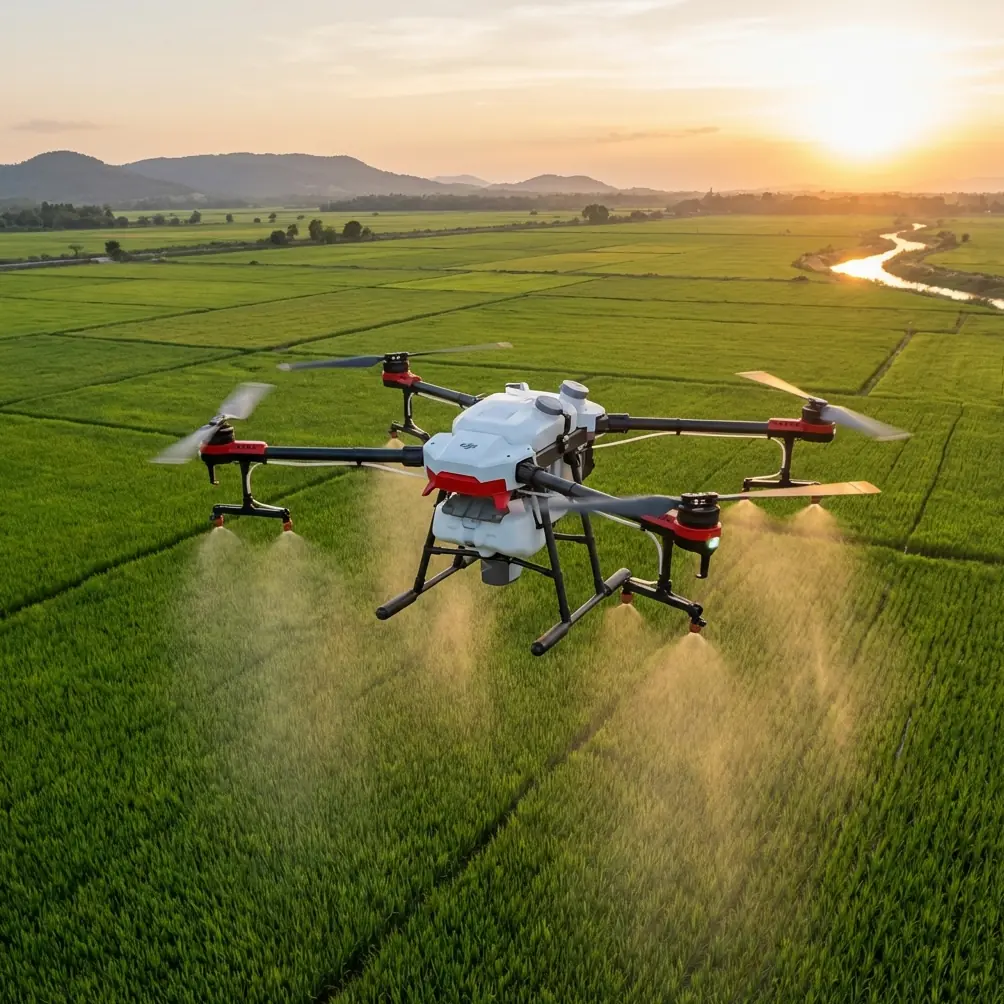
Agras T50 Guide for High-Altitude Wildlife Survey Work: Why Flight Height Matters More Than Most Teams Think
META: A practical Agras T50 guide for high-altitude wildlife survey planning, focused on optimal flight altitude, sensor behavior, positioning stability, and field-ready operating discipline.
By Marcus Rodriguez, Consultant
Most discussions around the Agras T50 start in the wrong place for wildlife survey work. People jump to payload, coverage, or weather resistance. Those things matter, but they are not what usually determines whether your data is clean or your mission turns into a long day of partial sightings, unstable positioning, and inconsistent passes.
For high-altitude wildlife surveying, flight height is the real control variable.
That sounds simple until you unpack what “height” means in practice. It is not just a number on the controller. It is the relationship between the aircraft, the terrain below, the texture of the surface, the available light, and the way the aircraft’s close-range sensing behaves when the ground is either too near, too far, or visually poor.
Even though the Agras T50 is built for serious field operations, operators planning wildlife observation flights in mountain terrain can learn a lot from a very specific sensor reference point: a TOF height sensing study showing a practical measurement range of about 30 to 900 centimeters. Below 30 cm, the sensor returns a fixed value of 10. Above 900 cm, it returns a fixed value of 6553. That is not trivia. It is a reminder that optical and distance-based sensing systems are extremely useful, but only inside their intended envelope.
For wildlife teams working at altitude, that single fact should shape how you think about low-level terrain following, takeoff transitions, and close-proximity passes over uneven ground.
The altitude problem in wildlife survey missions
Surveying wildlife in high-altitude environments is different from standard field scouting. The terrain changes quickly. Surface texture can vary from rock to scrub to snow patches. Light can swing from brilliant glare to deep shadow in a single valley. Wind behavior is rarely linear. The aircraft may hold a clean route over one ridge and then fight for consistency in a bowl or drainage 200 meters later.
In those conditions, “fly at the planned altitude” is not enough. You need to define which altitude matters:
- altitude above takeoff point
- altitude above terrain
- altitude relative to the target species
- altitude required to preserve stable sensor input
- altitude needed to reduce disturbance
With an Agras T50, this becomes an operational balancing act. You want enough separation to avoid disturbing animals and to maintain safe margins over broken ground, but not so much that your observational value drops off. If your workflow involves external imaging, multispectral support, or georeferenced observation logs, that balance gets tighter. The goal is not just seeing animals. The goal is seeing them consistently, while maintaining repeatable positioning and usable records.
Why a 30 to 900 cm TOF envelope matters, even on a much larger aircraft
The reference data comes from an educational drone platform, not the T50 directly, but the operating lesson transfers well. The TOF sensor in that material performs best within a band of roughly 30 to 900 cm above the viewed surface. It also notes that visual positioning stability improves when the aircraft is within that same band, in good light, over a surface with rich texture.
That is the key operational insight.
No one is suggesting you should fly an Agras T50 30 to 900 cm over wildlife habitat as a normal survey method. In many wildlife scenarios, that would be too low, too disruptive, and too risky over uneven alpine terrain. The real lesson is that downward sensing and vision-based stability have boundaries. If your mission design assumes the aircraft can interpret ground proximity equally well across every altitude band and every terrain texture, you are building risk into the job.
At high altitude, ground surfaces can become visually deceptive. Uniform scree, wet rock, patchy snow, or sparse grass can reduce the “texture richness” that visual positioning systems prefer. The source material explicitly calls out the need for sufficient lighting and a textured surface beneath the aircraft. That matters operationally because high mountain wildlife work often happens in the exact opposite conditions: low-angle sun, harsh contrast, moving cloud cover, or surfaces that look flat to optical systems.
So when we talk about choosing the optimal flight altitude for the Agras T50 in wildlife survey work, we are not just choosing a number that protects the animals. We are choosing a height strategy that does not over-rely on close-range visual sensing in conditions where that sensing may be less stable.
The smart altitude strategy: separate transit altitude from observation altitude
A mistake I see in field planning is using one altitude for the entire mission. That rarely holds up in mountainous wildlife operations.
A better method is to divide the mission into phases.
1. Transit altitude
This is your terrain and safety altitude. It should prioritize obstacle clearance, wind margin, and route continuity over data collection. In steep or broken landscapes, the T50 should move between observation zones at a conservative height that reduces the chance of abrupt ground-relative changes.
This is where the TOF reference becomes useful in reverse. Since close-range sensing has a limited range and can saturate outside that band, you should not plan transit logic as though near-ground optical sensing will solve every terrain change for you. Give the aircraft space. Use terrain understanding, route discipline, and a strong RTK Fix rate strategy where available to preserve predictable tracking and centimeter precision.
2. Observation altitude
This is the height where you actually gather the wildlife data. It should be high enough to reduce behavioral disturbance and rotor-wash effects, but low enough to preserve image interpretability and target detection.
For some species, that means wider stand-off distances and oblique observation angles rather than straight overhead approaches. For others, especially in open habitat, a carefully managed top-down pass may work. The exact number depends on species sensitivity, terrain, weather, and sensor package, but the principle is universal: observation altitude should be selected for biological outcomes first, then checked against aircraft stability and visual quality.
3. Low-altitude validation phase
This is short, controlled, and not necessarily near animals. Before committing to a full mission, use a non-sensitive patch of ground to validate how the aircraft is reading the surface and holding position. The source document describes obtaining TOF height data without even taking off, then comparing readings with a ruler or tape measure. On a professional operation, the equivalent is a pre-mission sensing sanity check. Confirm your systems behave normally over the actual terrain type you will encounter.
That step often saves more time than any in-flight correction.
Why “surface texture” is not a minor detail
The source text makes a point many operators overlook: visual positioning is more stable when the area below has enough texture and lighting.
In wildlife surveying, this is huge.
A rocky slope with varied contrast usually offers better visual references than a broad snowfield or a flat dusty plateau. A mixed shrub line may support more reliable downward visual cues than uniform dry grass under hard noon light. If your mission requires the aircraft to hold especially smooth position for repeated observations, don’t evaluate the route only by topography. Evaluate it by what the aircraft sees underneath.
This can influence:
- where you begin and end a pass
- whether you run parallel or cross-slope
- whether a route should be shifted by 20 or 30 meters to track over more textured ground
- whether low-light windows should be avoided
- whether your survey timing should be moved to improve visual contrast
This is also where multispectral workflows can complement visual survey missions. If your broader program mixes wildlife observation with habitat condition analysis, the same route planning that improves visual positioning may also improve interpretability across vegetation zones.
Flight discipline matters more than speed
The second reference document is about aerobatic training, which on the surface seems unrelated to the Agras T50. But one lesson carries over beautifully: good flying starts with a clean entry line. In that source, the pilot is taught to establish a path parallel to the runway before beginning the figure. If the entry line is off by only a few degrees, the deviation grows until the aircraft ends up far from where the pilot intended.
That is exactly what happens in wildlife survey work in the mountains.
A small heading error at the start of a pass becomes a large lateral drift by the end. A slightly misaligned approach pushes the aircraft over the wrong ridge shoulder. A barely noticeable altitude mismatch on entry turns into inconsistent subject scale across the observation leg.
The aerobatic text also emphasizes rhythm and symmetry. Again, that translates directly. Wildlife surveying should not be flown as a sequence of improvised corrections. It should have repeatable geometry: same approach speed, same observation height, same line spacing, same turn logic, same standoff behavior near sensitive zones.
That is how you get usable comparisons between flights rather than a folder full of disconnected clips and uncertain notes.
What to do about rotor wash, spray hardware, and agricultural configuration
Because the Agras T50 is an agricultural platform, wildlife teams need to be deliberate about configuration choices. If the aircraft is being adapted for observation support rather than application work, your field setup should account for aircraft behavior that normally matters in spray operations.
Take spray drift as an example. In wildlife work, the concern is not chemical movement but air movement. Rotor wash can alter animal behavior, disturb loose substrate, and introduce dust into imaging. That means observation altitude should not be set purely by visibility. It should also account for how much downwash reaches the target zone.
The same practical mindset applies to nozzle calibration and swath width language. Even if you are not spraying, those concepts teach route discipline. Agricultural pilots think in repeatable lanes and known coverage widths. Wildlife operators using a T50 benefit from the same structure. Define your effective observation swath width before launch. Don’t guess it in the air. If your sensor can reliably identify animals only within a certain corridor, that corridor is your true swath, and your line spacing should be built around it.
RTK, repeatability, and why centimeter precision actually matters here
Centimeter precision sounds excessive until you need to revisit a den site, track herd use of a ridgeline, or compare habitat occupancy over time. High-altitude wildlife programs often depend on consistency more than raw area coverage. A strong RTK Fix rate helps the T50 maintain repeatable paths, cleaner geotagging, and better spatial confidence when returning to observation points.
This becomes especially valuable when terrain forces narrow windows for safe access. If you have one good weather window and need to replicate the same flight later, precise route recovery is not a luxury. It is how you make the dataset comparable.
For teams building this kind of workflow, it helps to discuss mission architecture with someone who understands both agricultural platforms and survey adaptation. If you need a practical sounding board on route design or field setup, you can message the operations desk here: https://wa.me/85255379740
A field-tested altitude rule for the Agras T50 in wildlife surveys
If you want one operating principle to carry into the field, use this:
Fly as high as needed for animal welfare and terrain safety, but as low as necessary for stable, interpretable data — and never assume downward sensing will rescue a poor altitude decision.
That principle forces the right questions:
- Is the observation altitude causing disturbance?
- Is the route too low for uneven terrain transitions?
- Is the aircraft depending on visual positioning over low-texture ground?
- Is the lighting adequate for stable surface reading?
- Is the pass geometry repeatable enough to compare one sortie to the next?
Those are better questions than “What height should I use?” because they acknowledge that the best height is always conditional.
My recommended workflow
For most teams using an Agras T50 in high-altitude wildlife observation support, I recommend this sequence:
- Map the terrain first, not just the target area.
- Separate transit and observation altitudes in your mission design.
- Validate sensor behavior over representative ground before you approach sensitive habitat.
- Choose routes over textured, well-lit surfaces when possible to support visual stability.
- Standardize pass geometry the same way a disciplined pilot standardizes aerobatic entry lines.
- Set an observation swath width intentionally, based on actual detection performance.
- Review disturbance indicators after the first pass and adjust upward if needed.
- Use RTK-enabled repeatability for long-term monitoring programs.
The Agras T50 is a serious field machine. But in high-altitude wildlife survey work, the best results do not come from brute capability. They come from restraint, structure, and a realistic understanding of what onboard sensing can and cannot do near the ground.
That is why the modest detail from the reference material matters so much: a TOF sensing range of about 30 to 900 cm, with fixed outputs below and above that band, tells us something bigger than sensor limits. It tells us that good missions are built around envelopes, not assumptions. Add the second lesson — establish the correct line before the maneuver begins — and you have the foundation for clean wildlife survey execution with the Agras T50.
Ready for your own Agras T50? Contact our team for expert consultation.